I was in search of a quick, low calorie dessert to bring to a dinner party and came across this recipe in a Cooking Light magazine. It was super easy and very tasty too!
1 box angel food cake mix (16 oz)
2 oz bitter sweet chocolate
1/4 cup brown sugar
3 T heavy cream
1/4 cup butter
pinch of salt
3 T toasted, chopped pecans
Prepare cake as indicated on box or buy a prepared angel food cake. Melt chocolate in microwave - stirring every 10-15 seconds. Drizzle over prepared, cooled cake.
In a small sauce pan, combine brown sugar, heavy cream, butter and salt. Cook over medium high heat and bring to a boil. Reduce heat and cook about 4 more minutes. Drizzle over top of cake. Sprinkle toasted pecans over carmel and chocolate.
Nutrition Facts
16 Servings
Amount Per Serving
Calories 177.4
Total Fat 9.6 g
Saturated Fat 4.5 g
Polyunsaturated Fat 1.0 g
Monounsaturated Fat 3.4 g
Cholesterol 19.8 mg
Sodium 29.7 mg
Potassium 43.7 mg
Total Carbohydrate 23.0 g
Dietary Fiber 0.8 g
Sugars 4.7 g
Protein 2.4 g
Disney Trip Tips
So we decided to take a quick trip to Disney with our 4 year old son to check it out. When we made the decision to go I really didn't realize there was so much planning. Years ago when my mom took us to Disney, we just went and did what we wanted. Now it's all about reservations and planning - if you really want to see anything and not spend your day waiting in line. Once I found this out, I jumped on board and started planning. Here are my tips for visiting Disney World with a four year old.
Dining/Food: If you plan on having sit down dinners at the parks or hotels, you should make reservations six months in advance. They allow reservations six months in advance and things do get booked up quickly. I strongly suggest making reservations as soon as possible especially for the character meals. I do also recommend looking at the schedule for the parks and their shows for the dates you are visiting and make reservations at restaurants in the park or near the park you plan to be at for that particular day. This will minimize your time traveling all over just for a character meal. (check schedules on http://www.wdwinfo.com/).
Dining Plan: The other major decision is the meal plan...should you do it? That really depends on what your eating habits, likes/dislikes are. We did decide to do one of the meal plans (1 counter service meal, 1 sit down meal and 1 snack each day). Personally I would not decide to do the meal plan again (unless they were offering the "free dining" special) because it just seemed too limited for us. We also don't benefit from the desserts that are included because we don't always eat dessert anyway. We also found that especially in Epcot there were so many other food choices that we were interested in that were not included on the meal plan, but since we already paid for the meal plan, we just didn't want to spend more money on additional food. Restaurants that we did enjoy for character meals: Akershus, O'Hana and Chef Mickey's. I do also suggest to bring some light snacks for your kids. I packed granola bars, peanut butter crackers, raisins, fruit strips, Cheez Its and some individual lemonade packages to mix with bottled water. It was easy to just pull out a snack while in line or while walking to another attraction without stopping and buying an expensive food item.
Things To Pack: In an earlier blog post, I did share some ideas for things I bought for my son before we went to Orlando. See my other post for details, but my favorite purchases were the Mickey Mouse t-Shirt (from Walmart for $5) and the Buzz Lightyear t-shirt (also from Walmart for $5) and the Buzz Lightyear Pajamas. I brought along a small gift bag decorated with a Disney character sticker for each item. After my son went to bed each night, I put out the gift bag for him on the dresser. I also decorated the bathroom mirror with Disney character wall decals I bought at the dollar store while my son was sleeping. He loved it! When he was tired in the morning and didn't want to get up but we had to get moving for a character breakfast or something, we told him there was a small gift from Mickey on the dresser and he went nuts! It was so cute! He also loved the Mickey Pez dispenser! Other things I packed that he liked were glow bracelets, small light up toys (for scary rides/night time shows), small first aid kit, rain ponchos (just in case it rained...who wants to carry an umbrella?), snacks, lemonade packets, hand sanitizer, anti-bacterial wipes, baby wipes, disposable kids toilet seat covers, travel size sunblock, change of clothes for my son (just in case!), camera, video camera, cell phone (with Disney line wait applications - which was helpful in the parks!), jacket (for night time) and sunglasses.
Strategy/Planning: I did use a book to help plan our time efficiently in the parks. I use the Unofficial Guide to WDW and I found it very helpful. I think it was worth the money especially if you plan to visit the parks at a busy time of year or have limited time in the parks and want to make the most of it. The book gives you an idea of which rides fill up at which times and how to use the Fast Pass system (if you learn anything, learn about Fast Pass before you go!). There was also valuable information on the hotels and restaurants that are a good guide. There are other books available that offer the same type of information, so head to the bookstore and check them out. Another option, ask a friend about borrowing a book. You will be surprised how many friends are also planning a trip to WDW too (we had 3 different friends all going within weeks of our trip!). **Read my other post on what our strategy/day plan was for the Magic Kingdom. It worked great and we managed to avoid lines almost all day!
Hotel Review: We stayed at the All Star Sports Resort. This is in the cheapest category of on-site hotels, but it worked fine for us. The room was brightly decorated and clean. The room was pretty small. There were two full size beds and not much room to walk around them. The bathroom was tight. The sink/vanity was in the main room and the toilet/shower in a separate room. Though the room was small, it met our needs for our 3 night stay. There was also a safe in the room which was nice. Disney hotels also have cribs/bed rails available which is great for parents. We requested bed rails for our son and that worked out great! One of the other benefits to Disney hotels is the transportation. They Magical Express transfer from the airport is included and they transfer your baggage to the hotel for you. In addition, the transportation to the all of the parks and other Disney hotels is included. We used all of the Disney transportation while there and rarely waited more than a few minutes for shuttle to arrive. Overall, we had a great stay and the price was right. The room was normally priced about $110 per night, but was on special for about $80 per night!
Other Comments/Observations: Disney was so much fun. There is so much there to do, you will never see it all on one trip. Have an idea of what you really want to see/do before you go and make a plan - even if it is just a loose plan. Use the free WDW Planning DVD (they will mail you one if you register for it on the website) to help you and your family decide what they want to do. Bring your camera and make sure it is charged up! Take lots of photos. Stop to saver "the magic" while there. It truly is magical! The park fills up later in the day, so start early if you can to maximize your time there. Make advanced reservations for the character meals...it was so worth it!
One Day in Disney with a Four Year Old
When we started planning our Disney trip I had no idea I would have to plan so far in advance and have a strategy to get through the park easily. The more I looked online, I realized that there is a whole Disney underworld I knew nothing about. There are websites, books and more to help people plan every second of their day and strategies to avoid waiting in line for anything. I really thought we would just go wander around Disney for the day and have a good time doing whatever sounded like fun, but then I quickly realized with only 1 day to devote the the Magic Kingdom and an impatient 4 year old I should have a plan. This is what we did on our 1 day grand tour of the Magic Kingdom.
Arrive at park 30 minutes prior to opening. Bring breakfast and just wait for park to open. Also wait to watch the Disney Characters arrive on the train to officially open the park with their morning show. Once inside the park -head straight to Fantasyland.
9:00 - 10:30am
Pick up Fast Pass for Peter Pan
Ride Dumbo
Ride Cinderella's Carousel
Ride Snow White's Scary Adventure
Ride It's a Small World
Pick up Fast Pass for Mickey's Philharmagic
Peter Pan Meet and Greet
10:30 - 1:00pm
Walk to Frontierland - bathroom break on the way and a snack for my son in route
Pick up Fast Pass for Splash Mountain
Ride Big Thunder Mountain Rail Road
Ride Magic Carpets of Aladdin
Pick up Fast Pass for Jungle Cruise
Meet and Greet with Aladdin and Jasmine
Lunch at Pecos Bill's
1:00pm - 3:00pm
Bathroom Break
Train to Toontown
Ride Goofy's Barnstormer
Ride Speedway
Pick up Fast Pass for Toy Story
Monster's Laugh Floor
Stitch's Great Adventure
Snack, Shop, bathroom break
Ride Toy Story
3:00pm - 5:00pm
Use Fast Pass to Ride Peter Pan
Use Fast Pass to watch Mickey's Philharmagic
Use Fast Pass to ride Splash Mountain
Use Fast Pass for Jungle Cruise
5:00pm - 6:00pm
Shop/Bathroom break
Watch Move It, Shake It, Celebrate it Parade by castle
6:00pm leave park and take monorail to Contemporary Resort
6:30 - 8:00pm Dinner at Chef Mickey's
8:00pm-9:00pm Bathroom break and transfer back to Magic Kingdom
9:00pm Watch Electrical Parade near entrance of park
We were done after that and quickly transferred back to our hotel. The fireworks follow the parade so stay if you like.
This plan worked great for us. We were able to do just about everything we wanted to do all in one day. Our son had a blast and loved it. The longest we waited in line for anything was about 10-15 minutes which was great. We did bring a stroller since there was a lot of walking for a 4 year old, but you may also rent strollers there. I hope this helps you in planning your perfect day at the Magic Kingdom!
Creating Memorable Cheap Disney Magic
So we are planning our first Disney trip for this fall and I have been up to my eyeballs in trying to figure out the best way to plan this trip and not spend a fortune! I am not really sure this is possible, but in my true Striving 2B Supermom fashion, I am out to find the best tips and tricks to make this as cost effective as possible. I am a big planner so here I am in March trying to figure all of this out.
This Disney trip is really an add on to our 1 week at Atlantis in the Bahamas. Since we are already headed south and have to buy airline tickets, why not combine the trips together and save some money on another airline ticket a few months later? In my research, I found a great deal from Detroit to Orlando, Orlando to Nassau and Nassau back to Detroit all for $327 per person (including tax!). What a deal! On our past trips just to Nassau, we have spent $350-$450 per person so I jumped on these tickets right away.
Now it's time to choose a hotel. There are so many ways to do this and so many budget options, but I think we have decided to stay at a Disney property. We will only be in Orlando for 3 nights and we don't want to take a ton of time driving and shuttling around when we can be enjoying activities. After checking prices and hotel options, we choose the Disney All Star Sports Resort. My son is a sports addict and I think he will go nuts seeing that resort. While it is a budget hotel, it offers a great price of $78 per night in October (Disney is running a special!). It also offers a free round trip bus transfer from the airport. I think for our short stay, this will work out great! Normally we are condo people but for 3 days it's not worth the hassle.
Now for the fun part....getting creative. I want this trip to Disney to be as magical as possible for my son. At 4 years old he will go nuts over all the characters and activities. I want accomplish this magical experience without breaking the bank...time to think hard!
I decided to do some souvenir shopping here and bring some things with me instead of paying 5x as much in Disney. I figure I can easily wrap these little gifts in Disney wrapping paper and pack them in my suitcase for our trip. I can also put some of them in my son's backpack for the airline flight.
For a trip to Walmart and a trip to the adjacent Dollar Store I spent $62 for all of these fun Disney items:
-Buzz Light Year water bottle with clip (so I can clip it on my stroller)
-Small Disney princesses sticker/coloring book
-Small Cars sticker/coloring book
-Nice, hard cover Disney Story book - about 1 1/2 inch thick nice book!
-Tinkerbell kids flashlight (great for night time at Disney when my son doesn't like it dark)
-Cars sunglasses
-Mickey Mouse t-shirt
-Buzz Lightyear and Woody T-Shirt
-Toy Story Character 3 piece pajama set
-Mickey Mouse Pez Candy kit with refills
-Mickey Mouse puzzle
-Mickey Mouse paddle and ball set
-Disney princesses stamp kit
-Disney princess tic tac toe game
-Cars stamp/sticker set
-Disney character tamborine (fun for the parade)
-Disney character flash cards for words/spelling/letters (for the plane ride)
-Glow bracelets (pack of 8) for night time parade/fireworks
-Glow necklaces (pack of 8)
I know I have saved a ton of money just on all the stuff we won't have to buy there. The clothes are things I will need to pack anyway and some of the toys can be new things in his backpack for the flight down. This is going to be fun!
Spinach, Beef and Pasta Bake - kid friendly!
My finicky 3 year old has no idea there is spinach in this dish and he just eats it up! Enjoy!
1 lb ground beef (you may substitute ground turkey)
1 medium onion
2 large cloves garlic
1 12 oz bag baby spinach
1/2 cup grated parmesan cheese
1/4 cup Italian bread crumbs
1 15 oz can diced tomatoes
1 lb mozzarella cheese - diced
1 22 oz jar spaghetti sauce
1 lb cooked pasta (whole wheat pasta works well too)
Put onion and garlic in food processor and process until fine. Place onion and garlic in large skillet. Put spinach in food processor and process until fine. Place spinach in skillet with onion/garlic. Add meat to skillet. Saute until meat is cooked through. Add S&P as needed.
In a large bowl, add cooked pasta. Add in spinach/meat mixture. Toss in tomatoes, parmesan cheese, mozzarella and bread crumbs. In a large casserole dish (deep 11x13 or so) pour half the jar of spaghetti sauce on the bottom and spread to cover. Pour pasta mixture in casserole dip. Pour other half of spaghetti sauce over top. Cover with foil and bake at 400 degrees for 35-40 minutes until bubbling and hot.
Italian Chicken Stew
4 large boneless chicken breasts cut is small pieces
1 onion diced
1 green pepper diced
3 cloves garlic minced
8 oz sliced mushrooms
4 large carrots in 1/2 inch slices
2 celery stalks cut in 1/2 inch pieces
2 large potatoes, in small, thin pieces
1 cup white wine
1 28 oz can of diced tomatoes
oregano
basil
salt/pepper
Olive Oil
Saute chicken, onion, garlic, pepper, carrots, celery and mushrooms until chicken is cooked through. Add in wine and let cook down for a few minutes. Add in canned tomatoes and their juice. Add in oregano, basil and S&P to taste. Cover and simmer 1 hour. Add in potatoes, cover and cook for 1 more hour or until potatoes are cooked. Serve plain or over rice. Freeze the leftovers!
Low Calorie Crustless Quiche
Mornings are busy in our house so trying to eat a healthy breakfast can be a challenge. I decided to plan ahead and make something healthy we can quickly microwave in the mornings. These quiches are tasty, easy to make and very inexpensive!
5 eggs
3 egg whites
1 cup 2% milk
1/2 cup diced onion
1/2 cup diced mushroom
1/2 cup diced red or green pepper
1 tsp olive oil
garlic powder
salt
pepper
cayenne pepper
4 slices 2% American cheese
Cooking spray
Pre-heat oven to 325 degrees. Spray 12 count muffin pan well with cooking spray and set aside.
In a skillet, add in olive oil, onion, pepper and mushroom. Saute until veggies are cooked. Set aside to cool slightly.
In a large bowl, whisk eggs and egg whites. Add in milk and combine. Add in salt, pepper, garlic powder and a few pinches of cayenne. Combine well.
Put one spoonful of the veggie mixture in the bottom of each muffin cup. Put 1/3 of a cheese slice into each cup over the veggies. Pour egg mixture evenly into each cup over the veggies and cheese.
Bake in oven for 35-40 minutes until eggs are cooked through.
Each quiche has about 50 calories. I freeze mine on a cookie sheet and then put them in a large freezer bag so they don't stick together. Quickly microwave in the morning. If you like a breakfast sandwich, serve on a toasted whole wheat English muffin! You still have a quick, healthy breakfast sandwich for less than 200 calories! Enjoy!
Also feel free to make variations of this recipe. Here are some ideas:
Mushroom, turkey sausage, cheese and basil
Turkey bacon, onion, spinach and feta
Asparagus, Parmesan and garlic
Broccoli, turkey bacon and cheddar
Mexican - leftover taco meat, cheddar, salsa or tomatoes
Stuffed Peppers
I was shopping this week and Red Peppers were on sale for $1.00 each which is a real deal so I was inspired to make some stuffed peppers.
1 lb ground sirloin
4 large red or green peppers (tops cut off, insides cleaned)
3 cloves garlic - minced
1/2 onion - diced fine
1 cup mushrooms - chopped fine
1 14.5 oz can of tomatoes (I used stewed, but diced are fine too)
3 cups cooked rice (1 1/2 cups dry)
3 oz. shredded Romano Cheese
Dried oregano, parsley, basil
Salt and Pepper
1 jar of your favorite Spaghetti sauce
Cook the rice so you yield 3 cups. While cooking rice, boil salted water in a large pot to cook the peppers. Once the water boils, put in the peppers and cover. Cook 5 minutes and drain inverted.
In a large skillet, combine sirloin, garlic, onion and mushrooms. Add in salt, pepper, oregano, parsley and basil to your liking. Cook until meat is brown and veggies are soft. Stir in the can of tomatoes and about 1/3 of the jar of spaghetti sauce. Transfer to a large bowl to cool slightly. Add rice to meat/veggie mixture and combine. Add in romano cheese and toss well.
Pour about 1/3 of the spaghetti sauce in the bottom of a large casserole dish to coat. Add the peppers into the pan. Fill the peppers with rice/meat mixture. Put tops on peppers. Pour remaining spaghetti sauce over the tops of peppers. Cover and bake for 30 minutes.
***Note: You will only use half of the stuffing mixture. I usually freeze the extra and use it next time peppers are on sale. You could also make 8 peppers at this time, or half the recipe and not have mixture leftover.
Amalfi Coast - Second Stop Positano!

Now that we finished our visit to Agropoli, it was time to head to Positano. We drove the rental car from Agropoli to Salerno and dropped it off in downtown (that was fun...beware, more crazy driving and navigating). We walked from the car rental office down to the marina to catch a boat to Positano. We took the boat and arrived less than 2 hours later. Upon arrival in Positano, we searched around to find someone to take our bags up the hill and stairs to our hotel (trust me - you won't want to take your bags yourself...Positano is built on a hillside and it's a hike up!).

Positano is a stunning little coastal town which holds special memories for me (my husband and I got married there in 2004!) so going back this tine wit my mom and my son was incredible!
Our hotel was called Villa Rosa. On a previous trip to Italy we stayed at their sister property called Villa La Tartana which we loved. This time we selected Villa Rosa because they could offer a 2 bedroom and 2 bath suite with a large balcony with view. Since my mom and son were with us this time, that made the most sense. To reach the main lobby there were stairs going up to a doorway and stairs going back down to get in the lobby (stairs are unavoidable in Positano!). The staff was nice enough to let us store our stroller in the lobby so we would not have to carry it up and down the 3 flights of stairs to our room.

Our breakfast was served each morning on our patio overlooking the sea. The breakfast consisted of rolls, croissants, orange juice, milk, cappuccino and assorted jams and spreads. We went to the store and bought some Italian salami and cheeses to add to our breakfast. The room offered a refrigerator which was great to keep our salami and cheese fresh as well as for beverages or snacks for my son.
 |
| One of our bedrooms in our 2 BR suite at Villa Rosa in Positano |
The location of the hotel was good. It was not too far from the main square which made it convenient to the bus. To get to the waterfront where the boats are, it was a 10-15 minute walk down the hill and stairs. As I mentioned before, there are few places you could stay in Positano to avoid stairs.
Our Itinerary: We arrived mid-day on a boat from Salerno to Positano. Upon arrival, we got someone to take our bags to our hotel. Yes it was expensive, but with my mom, a 2 year old, car seat and stroller, we did not care how much it cost! There are services available near the dock area if you ask around. Once we checked in, we set out for lunch (go figure). My husband and I went out and picked up some pizza and desserts for lunch and brought it back to the room. We ate on the balcony overlooking the sea! What a treat!
Later that afternoon, my mom and son wanted a rest, so me and the hubby walked around Positano remembering our wedding from our last visit. We went to Tre Sorrelle right at the waterfront and had a glass of wine and relaxed. We hit a few shops and headed back to the room.
Now it was time for dinner. We headed out to Bruno's right near the hotel.

At Bruno's we had some pasta and wine. It was reasonably priced and offered outside seating. It is located at Via Christoforo Colombo, 84017 Positano. This restaurant had good food for a reasonable price and even offered Gluten Free pasta! (we did not need that, but it's nice to know for others with gluten allergies). After a late dinner, we relaxed in our room and sat on the terrace with a glass of wine.
 |
| My little one enjoying spaghetti at Bruno's in Positano |
 |
| More views of Positano |
 |
| Views of Positano from the ferry dock and beach area |
On the next day we got up and enjoyed breakfast on the terrace and got ready for our day in Amalfi and Ravello. We hopped on the bus from Piazza Mullini and headed for Amalfi. The bus ride from Positano to Amalfi is like nothing you have ever experienced. I called the bus "the scary bus". You have to picture why this ride is what I consider scary. All the towns on the Amalfi Coast are built up the side of hills so the road is winding all around each of the very large hills that hug the coast. The road twists and turns like crazy and is extremely narrow in some spots making it only passable by one car (total..not one car for each direction). The driving is insane and "scary" as is the fact that the road hangs over many cliffs. The scenery is simply stunning and like nothing you will ever see. Every time you turn another bend in the road your eyes will widen and you will think it is the most lovely view you have ever seen. This continues all along the scenic but oh so scary bus ride until you reach Amalfi. The ride takes about 20 minutes. If you want to film or take photos, sit on the right side of the bus so you are along the water. As scary as it is (especially since I am afraid of heights), it is amazing. I white knuckled it all the way and saying a few prayers, but took in every second of the spectacular, scary views! You MUST take the bus at least one way between Amalfi and Positano while you are there......the boat offers great views, but do not miss the bus trip! My son still talks about the "scary bus" a year later!
Upon arrival in Amalfi, you can easily walk a few minutes from the bus stop to the main piazza by the church. You will walk up the main street visiting shops, restaurants, pastry shops and markets. It's a fun stroll without all the stairs that Positano has. We spent a few hours strolling and then went back to the bus stop to catch the bus up to Ravello.
 |
| Views of the beach in Amalfi - with the Star Clipper sailing cruise ship offshore |
 |
| One of the shops in Amalfi |
 |
| The square and church in Amalfi |
 |
| One of the many little markets in Amalfi |
As if the bus ride from Positano wasn't scary enough, the bus ride to Ravello is nuts! You go even higher up the hillside, winding back and forth to the top to reach Ravello. I was so scared, but the views are absolutely incredible! We walked around and finally decided on a lunch break. We found a cafe in the little piazza and had some pannini's and wine outside while taking a break. After a late lunch we walked arounda bit and started our journey back to Positano. The busses get really crowded coming back late in the day and you may have to wait for another bus just to find a spot! Plan early to get back. I suggest doing Ravello in the morning and ended the day in Amalfi to avoid this problem. If you do head from Positano to Ravello, you will still need to change buses in Amalfi. Check out the SITA website for bus schedules.
 |
| Ravello Shops |
 |
| The square in Ravello where we had lunch |
 |
| Me and my little one strolling and shopping in Ravello |
Tonight was a special night for us. My mom insisted that my husband and I have dinner alone in our special town (we were just a few months shy of our 5 year wedding anniversary) since the last time we were there was for our wedding. I did not know, but my husband had made reservations at Caffe Positano, which is where we ate on our wedding night. He had reserved a balcony table - just like on our wedding night. They have 2 tiny balconies each with a small table for two. It was romantic and special since we had been there before. We started our dinner with a glass of prosecco and some antipasti and sat outside and enjoyed a nice dinner. The food is good there and the prices are reasonable. You can check out the website for more information: http://www.caffepositano.it/
The next morning we were off to Capri! Capri is a beautiful island and an easy day trip from many towns on the Amalfi Coast. With a quick boat ride you can be there in 30-40 minutes. Check the Metro del Mare website for schedules and prices.
 |
| Me and my little one at the ferry dock in Positano waiting for the ferry to Capri |
 |
| The views of Capri upon arrival by boat |
 |
| Views of Capri |
We walked around town and browsed the shops and took in the scenery. Later, we found a nice little restaurant for lunch.

 |
| views of Positano as we boat in from Capri |

 |
| The views from La Tagliata |
 |
| The place settings are even pretty at La Tagliata! |
 |
| Buffalo mozzarella appetizer at La Tagliata |
 |
| Platter of pasta at La Tagliata |
Dessert arrived on a platter with small little pieces of four different desserts......so yummy! We enjoyed the views and our huge meal and will have wonderful memories of our last night in Positano! In the morning, we were off to Rome!
Chicken and Green Chili Burritos
This is one of my favorites. If you choose to make it for guests, you can prep some before. I usually get the burritos assembled in the pan and wait to pour the sauce over the top right before putting in the oven so the sauce does not absorb into the flour tortillas and dry things out.
4 Large chicken breasts
4 cloves garlic, minced
1 onion chopped fine
4 T Olive Oil
2 T Flour
2 Cups Chicken Broth
16 ounces low fat or fat free sour cream
1 cup shredded low fat cheese (cheddar or similar)
1 four oz can diced green chili peppers
6 large flour tortillas
Cumin
Salt
Pepper
Onion Powder
Black olives, jalapenos, diced tomatoes and green onions as garnish if you want
Season boneless chicken breasts with cumin, salt, pepper, garlic powder and onion powder on both sides. Heat 2 T olive oil in large skillet. Saute chicken on both sides over medium heat until cooked. I usually keep it covered so it does not dry out.
While chicken is cooking, in a large skillet, heat 2 T of olive oil. Add in garlic, onion and 1/2 tsp cumin. Cook over medium heat until onions and garlic are soft. Add in flour and toss around. Add in sour cream and blend. Add in 2 cups chicken stock and green chilies. Blend and then add in 1/2 cup shredded cheese. Once sauce is thickening and bubbling, remove from heat.
Dice up chicken into small pieces and place in a bowl. Add about 2/3 cup of cheese, onion mixture into bowl with chicken and toss to coat. Lightly grease a 11x13 casserole dish with olive oil. On a work surface, lay out 1 tortilla. Add about 1/6 of chicken mixture. Top the chicken with a large spoonful of cheese and onion mixture. Roll up tortilla and place in casserole dish with seam on the bottom. Tuck ends downward. Finish remaining tortillas and place in pan. Pour remaining sauce over top and cover with tin foil. Bake at 350 degrees for about 40 minutes. Top with remaining cheese and bake uncovered for 5 minutes.
Serve each burrito on plate and top with any garnish you like (black olives, green onions, tomatoes or jalapenos). Serve with sour cream and fresh salsa or pico de gallo.
Side serving suggestions - black bean and corn salad, refried beans or Mexican rice.
Variation: add in 1 can of rinsed black beans to the chicken mixture before filling burritos. It will make an additional burritos and add more fiber!
Enjoy!!!
Bathroom Cabinet Makeover!
Well, I don't consider myself to be really handy or anything, but I got fired up to try this project on my own. I have the cheap, golden oak, builder's grade cabinets in my entire house and I just don't like them. I planned to replace the cabinets until I realized the previous owners tiled around the cabinets so that would potentially require me to pull up the master bath tile floor.....and that's not going to happen any time soon! I set out to find a way to change the look of these cabinets at a low cost and do a master bath mini makeover. This is the first step...rejuvenate those ugly cabinets!
Here is what the cabinet front looked like before:

I found this paintable beadboard wallpaper online and decided to give it a try. My plan was to wallpaper the really grainy, recessed part of the cabinet door facing to give it a better look. The wallpaper was ordered online from Home Depot for about $25 and had free shipping. It arrived a few days later.

Step One:Sand cabinets and wipe them down. I did not sand them much, it just took a few minutes to sand each door. I made sure to sand all parts including the edges along the side and the inside of the doors. I then wiped them down to remove all of the dust with a damp cloth and let them dry.
Step Two:
Prime cabinet for the wallpaper. I put one coat of this wallpaper primer on the recessed part of the cabinet door with a paint brush and let it dry overnight.


Step Three:
With a paint brush or paint sponge/brush, put a good layer of wallpaper glue on the recessed part of the cabinet door.


Step Four:Cut wall paper a few inches longer than needed. ONLY cut horizontal across the wallpaper...I plan on using the side edges to make sure there was a good, clean edge that would allow the paper to be lined up level with the door. Once you place the wallpaper on the side, push the top up into the corner as far as you can on the recessed part of the door and use a box cutter to trim any excess or uneven parts. Do the same across the top and on the other side and bottom. Use a wallpaper seam roller to roll all over to remove any air bubbles. Wipe off any excess glue at the sides with a damp cloth. Let wallpaper dry overnight.
 Step Five:
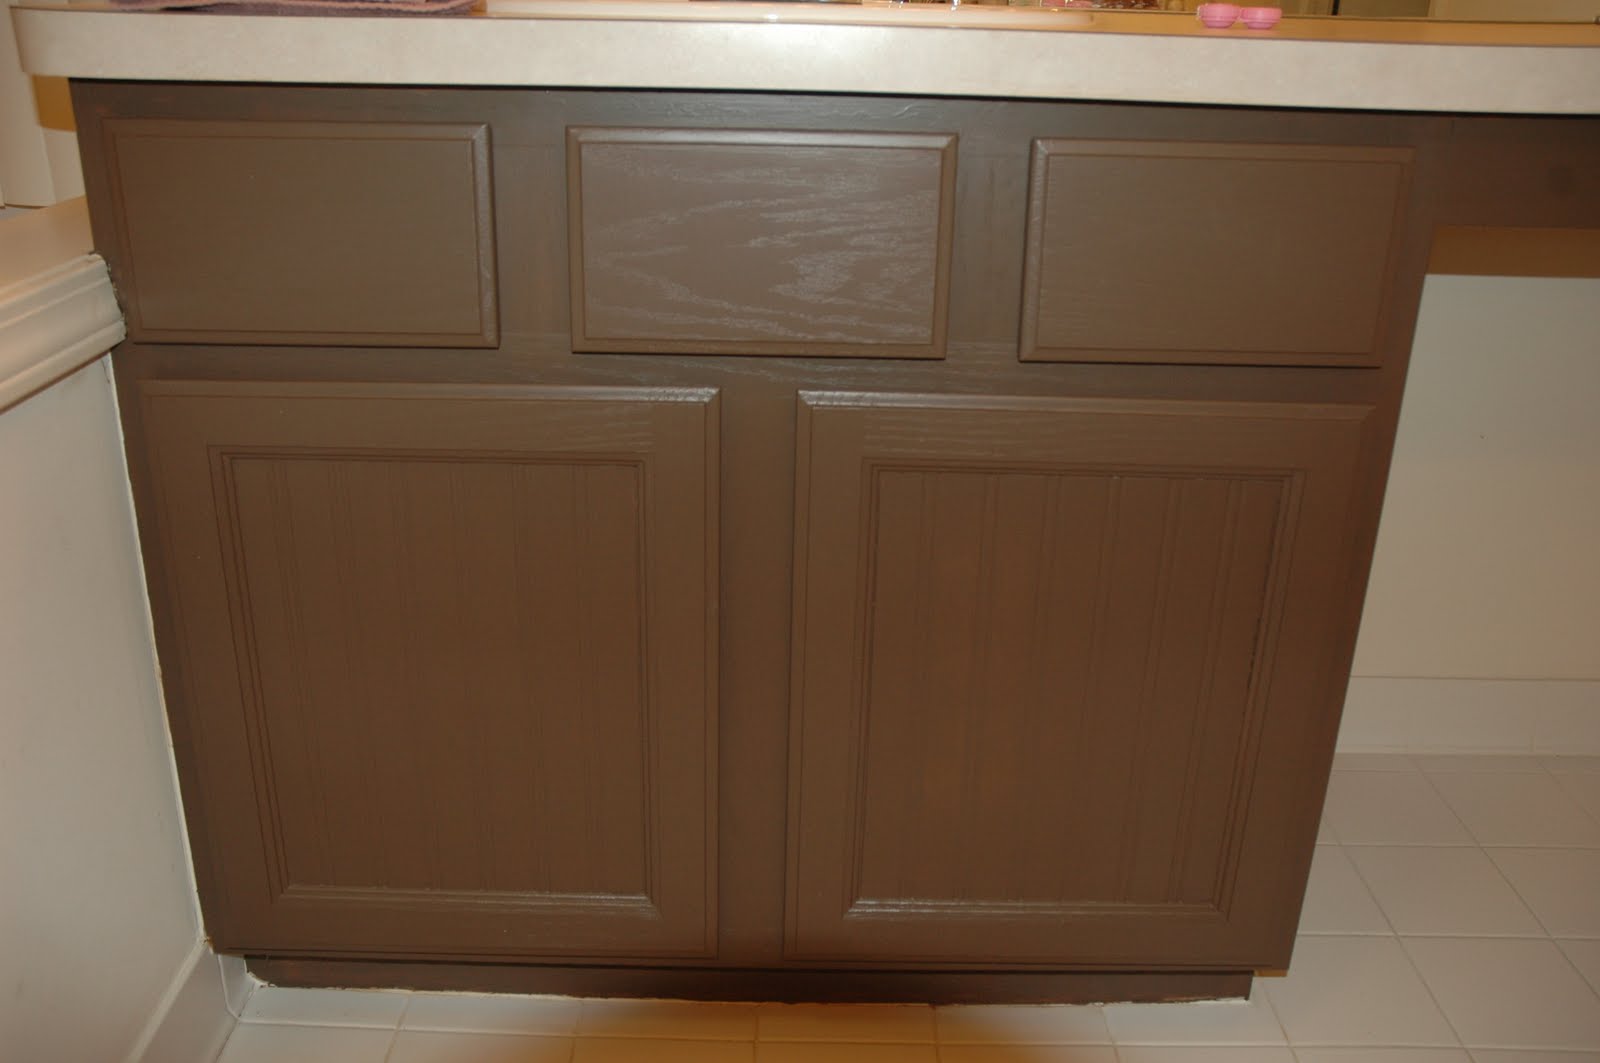
Paint! I used a small, super fine roller with some good quality Benjamin Moore paint in a satin finish. I used the color "Espresso" for my project, but you can use any color you like. I did about 3 coats of paint - but no primer on mine.
As far as the cabinet base and drawers, remove drawer fronts and sand them. Wipe clean and paint...again about 3 coats did it for me. I did the same with the cabinet base. I did all 3 coats in one day...it did not take long to dry.
Here is the final result.......drum roll please! :)

 This is just the first step in my ugly master bath mini makeover. Stay tuned for the next steps to master bath beauty!
My advice...go for it. I had NO idea if this would work or how it would look and I am completely pleased with the results. All of the supplies cost me about $100. I have enough stuff leftover that I can do the same thing with our guest bath - for that all I need is one quart of white paint so it will cost hardly anything. So essentially for about $115 I will have done both bathrooms. All I have to do now is get some nice cabinet pulls and it will be complete. I hope this inspires you to try something new and have some confidence that it will come out great!
Here is what the cabinet front looked like before:


I found this paintable beadboard wallpaper online and decided to give it a try. My plan was to wallpaper the really grainy, recessed part of the cabinet door facing to give it a better look. The wallpaper was ordered online from Home Depot for about $25 and had free shipping. It arrived a few days later.

Step One:Sand cabinets and wipe them down. I did not sand them much, it just took a few minutes to sand each door. I made sure to sand all parts including the edges along the side and the inside of the doors. I then wiped them down to remove all of the dust with a damp cloth and let them dry.
Step Two:
Prime cabinet for the wallpaper. I put one coat of this wallpaper primer on the recessed part of the cabinet door with a paint brush and let it dry overnight.


Step Three:
With a paint brush or paint sponge/brush, put a good layer of wallpaper glue on the recessed part of the cabinet door.

Step Four:Cut wall paper a few inches longer than needed. ONLY cut horizontal across the wallpaper...I plan on using the side edges to make sure there was a good, clean edge that would allow the paper to be lined up level with the door. Once you place the wallpaper on the side, push the top up into the corner as far as you can on the recessed part of the door and use a box cutter to trim any excess or uneven parts. Do the same across the top and on the other side and bottom. Use a wallpaper seam roller to roll all over to remove any air bubbles. Wipe off any excess glue at the sides with a damp cloth. Let wallpaper dry overnight.
Step Five:Paint! I used a small, super fine roller with some good quality Benjamin Moore paint in a satin finish. I used the color "Espresso" for my project, but you can use any color you like. I did about 3 coats of paint - but no primer on mine.
As far as the cabinet base and drawers, remove drawer fronts and sand them. Wipe clean and paint...again about 3 coats did it for me. I did the same with the cabinet base. I did all 3 coats in one day...it did not take long to dry.
Here is the final result.......drum roll please! :)

 This is just the first step in my ugly master bath mini makeover. Stay tuned for the next steps to master bath beauty!
My advice...go for it. I had NO idea if this would work or how it would look and I am completely pleased with the results. All of the supplies cost me about $100. I have enough stuff leftover that I can do the same thing with our guest bath - for that all I need is one quart of white paint so it will cost hardly anything. So essentially for about $115 I will have done both bathrooms. All I have to do now is get some nice cabinet pulls and it will be complete. I hope this inspires you to try something new and have some confidence that it will come out great!
Third Birthday Thomas The Train Party

My son LOVES Thomas the train so I decided to make his 3rd birthday that theme. I searched high and low to find the perfect Thomas cake for the wow factor. Of course striving 2 B supermom, I thought about making it myself...then I got a quick dose of reality when I tried to figure out when I might of time to actually make this masterpiece. Knowing his birthday party would be on a Saturday with about 45 people, I knew I just wouldn't have time.

I found the perfect Thomas cake at a local bakery but they wanted $120! Forget that. I called a gal who has made cakes for me in the past and she agreed to make it for $60 plus an additional sheet cake for $25. It was a steal and she makes THE BEST chocolate, chocolate chunk cake ever. Here is the AMAZING Thomas Cake!!!


Goody bags for kids were easy and fun to make. I bought some plain paper bags in primary colors from the local party store. I bought some Thomas the Train stickers and some printer labels in a larger size. I simply printed each child's name on the large size mailing labels in colors that matched the Thomas theme and placed a sticker on each label. I stuck each label on the bags and viola - custom looking goody bags. I filled the bags with candies, rice crispy treats, peanut butter cracker packs and Cheez It's in individual baggies. I always keep the goody bags simple with snack foods that the kids like.
Needless to say, my son had a great time and enjoyed all the "Thomas" stuff!!

Here was Jayden's birthday gift from us...my husband finished putting it together 10 minutes before the party started!

More presents!!!!

How Do I Plan A European Trip With Kids?
I asked myself this question over and over again before we finalized our trip to Italy. I realized that our trip would not be the same as our last time in Italy (our honeymoon), but it could still be fun for all of us if I just planned carefully. I knew I needed to plan some fun things for us and some child friendly things. The Internet became my friend in planning this amazing trip and I have never "googled" that much in my life! It was worth it though.
Here are my tips for planning a European trip with kids:
1. Check out apartments for accommodations. We found amazing places to stay that offered more than 1 bedroom and a kitchen. Having a kitchen for kids is great for milk, juice and some snacks. We didn't cook or anything, but we liked having things on hand for our son. Some apartments also offered a washer and dryer which is also helpful with a two year old eating lots of messy pasta! All of the places we rented offered a large Pack-N-Play or crib that worked fine for my son.
2. Find parks and playgrounds along the way and include time there for your little one. We took a few breaks in between sightseeing to visit a playground here and there. My son loved it! Sometimes you can also just get some sandwiches to go and take them with you to the park and make a picnic of it. Let them blow off some steam before you put them in the stroller for a sight seeing tour. My son slept his way through our Vatican tour and the Colosseum tour too! It gave us peace and quiet to enjoy the tour while he napped in his stroller. Also look for amusement parks near places you plan to visit and try to incorporate fun things for your kids into the itinerary. Google around to find information. I found some information only in postings on chat boards posted by other moms. I even found carousels in Rome and Florence that my son loved, just by googling!
3. Make transportation fun! My son loved taking the boats around Venice, the train to Rome and boats all along the Amalfi Coast. He especially loved the double decker sightseeing bus tour in Florence. He liked riding on top of the big red bus and it served as a great way to get around the city with a tired toddler. We just rode the bus around at the end of the day for an hour and he loved it after using it all day to get around.
4. Ask about child friendly activities. We were not sure if bringing our son to a cooking class or winery tour would be acceptable, but when we asked we were told "yes"! In fact most people responded with "your son will be our guest". They did not charge him to attend the cooking class, winery tour or the lunch at a winery we attended. Kids are very welcome in Italy so it doesn't hurt to ask.
5. Take advantage of easy, kid friendly foods. My son was always hungry for lunch before we were so we would just stop and get him a slice of pizza and let him eat in the stroller while we walked the town. Once he had lunch, he fell asleep in the stroller and then we went to a nice lunch while he slept in the stroller beside us. We were able to get him food he liked (pizza and pannini's) and it allowed us to have a nice, long, quiet lunch and rest our tired feet over a glass of wine. This worked great for us! I am thinking about the long lunch we had in Capri...simply tasty!
6. Have a plan! I strongly suggest planning out a daily itinerary of your activities and leaving a little time to be flexible (in case your little one just won't cooperate). Get advanced tickets for tours, train rides, etc....it minimizes time spent in line waiting to get into an attraction with a tired little one. Make sure there is something fun for your little one planned each day along with some down time (oh, and time for a daily gelato!). Fun can be simple (my son loved just splashing the water in Trevi Fountain), it doesn't have to be anything special. We even brought a ball and tossed it around the park and he was happy.
7. The Internet is your friend. Google everything and you will find information. I spent a lot of time on the Internet planning our trip and I really found some great websites and chat boards that were helpful.
I hope this helps someone in planning a perfect family trip!
Scary Steps Towards the Future!
I am taking more steps towards making my new business a reality. This week I officially filed paperwork to make my company an LLC. I also got my EIN # through the state. I also just registered my domain name for my website (piccolodesigns)and ordered a website template too (through Blu Domain). I can't believe I am really on my way!
This is all a bit scary. I feel like now I HAVE to really make this a success. For the next several months I will spend all my free time working on my website content and designs. My goal is to have the website up for business by fall.
Am I crazy? I still don't know how I can "do it all" while starting a business too. I don't want my full time job or family to suffer with me overextending myself. I know in the end that this a long term goal for me and it won't happen over night. I hope by the time my son is ready for school I can leave corporate America and run my business and be a mom. That's ambitious.....I have about 17 months. I know my goal may actually be a "stretch goal", but it doesn't hurt to try - right?
Starting the Business
OK so this business idea has been in the making for 3 years so I am really going to finally leap off and try it! It's a bit scary, but if it doesn't work...it doesn't work. I guess since I am starting this on the side I really have less to lose right now since I am still employed full time.
I have been so busy planning and it seems overwhelming. I have really gone through my entire business plan and reviewed expenses, marketing, websites, networking and more. I am really ready to get started. I am waiting for my new laptop to arrive so I can get the ball rolling. My goal is to get my website up and running by my birthday (in September). That may be a bit ambitious....I know I have SO much work to do, but I know that I CAN do it. I hope some of you will stay tuned and be inspired to live your dream of starting your own business. With computers, the Internet and cell phones, it's not as hard as you think! Be inspired......live your dream. Why keep thinking about what you want to do? Just do it! If you don't try, you will never know what you can achieve, right?
I have been so busy planning and it seems overwhelming. I have really gone through my entire business plan and reviewed expenses, marketing, websites, networking and more. I am really ready to get started. I am waiting for my new laptop to arrive so I can get the ball rolling. My goal is to get my website up and running by my birthday (in September). That may be a bit ambitious....I know I have SO much work to do, but I know that I CAN do it. I hope some of you will stay tuned and be inspired to live your dream of starting your own business. With computers, the Internet and cell phones, it's not as hard as you think! Be inspired......live your dream. Why keep thinking about what you want to do? Just do it! If you don't try, you will never know what you can achieve, right?
Mexican Chicken, Black Beans and Rice
This was my own creation....I am not always much of a measurer so you may have to improvise with amounts of things! It was tasty, a bit spicy and made A LOT so we have lots of leftovers this week.
3 large chicken breasts, cut in small pieces
2 T Olive Oil
1 medium onion diced
1 red pepper diced
3 cloves garlic minced
1 cup white wine (I used Pinot Grigio)
1 28 oz can diced tomatoes
1 cup rice (uncooked)
Fresh or dried parsley
Cumin
Chipotle Chili Powder
1 can black beans, rinsed and drained
Saute chicken in oil in a large skillet for a few minutes until chicken is not longer pink. Add in onion and green pepper - cook 5 minutes. Add in garlic and cook 2 minutes. Add wine, tomatoes (and the juice from tomatoes), and rice and mix well. Add about 1/4 tsp Chipotle Chili Powder (more if you like it hot!), add 1/2 tsp Cumin. 1 Tsp Parsley. Add Salt/Pepper to taste. Simmer and cover for 20 minutes. Add in Black beans and additional spices as needed. Serve with shredded cheese on top, extra hot sauce and a bit of sour cream.
Enjoy!
Am I Crazy???
Well, I have been thinking about it for years...thinking about starting my own business that is. I have been searching for the right idea for a long time and I keep coming back to the same basic idea, but this time I saw it in a new light! I have spent the last several months researching my ideas and planning. Today I did it...I made my first investment in my business! I bought a new laptop so I can get the ball rolling on my dream. A part of me is happy, but a part of me is freaking out! What am I thinking? I work full time in corporate America, I have a husband and 3 year old child, I teach aerobics a few times a week, I try to be a "part time" Martha Stewart and we entertain all the time! I keep trying to do it all and now I am trying to do it all plus run a business! I must really be crazy, right?
I keep thinking about the end goal which is more time with my son. I know I work in an industry that has been hit with tons of layoffs and I really anticipate being pushed out of this industry at some point in the future. It's not my dream job by any means, but I am paid very well and have excellent perks/benefits so I just can't leave on my own (all of my friends and I in this industry insist we are bound by the "golden handcuffs"). I feel stuck in a job rut and desperately want more family time, but I am paralyzed by the income and benefits my job offers. I know my employer will most likely drop me with a moment's notice at some point, so I guess I should have plan B ready right?
Well, I hope that my plan B turns into a strong, home based business I can work around my son's schedule while generating a good income. I love working - I was not cut out to be a stay at home mom (I tried it for a year and I missed having a career). I love being in the business world, but I miss my son. I hope I can find the best of both worlds in starting my own business.
I have talked to my husband about this and he has been supportive which is great. The best thing he asked today was "what do I get to do in the business"? I was shocked! I knew he supported me, but I didn't know that he wanted to be a part of my new venture. That's awesome! I don't know what role he will play yet, but it was so nice to hear he is really behind me and willing to help make this a success!
I don't know what the future holds for my success with this business, but I do know I am going to try very hard to make this work. I just hope I can find a way to juggle even more without affecting my family life too much. I know it will be a big challenge, but I am up for it! That is why I continually am Striving 2 B Supermom, right?
Asparagus and Chicken Carbonara
This was good! I made a few variations that I have listed in the recipe. It was full of flavor...even my husband and 3 year old son loved it! The recipe is from Cooking Light - enjoy!
Yield: 5 servings (serving size: about 1 1/4 cups)
Ingredients
8 ounces uncooked spaghetti
2 cups (1-inch) slices asparagus (about 3/4 pound)
1/2 cup egg substitute
1/2 cup evaporated fat-free milk
2 teaspoons olive oil
1/2 cup chopped onion
* 2 cloves garlic - minced (I added this in)
1/4 cup dry vermouth (I used white wine...didn't have vermouth on hand)
2 cups chopped skinless, boneless rotisserie chicken breast meat
1/2 cup (2 ounces) grated fresh Parmesan cheese
3 tablespoons finely chopped fresh flat-leaf parsley
3/4 teaspoon salt
1/2 teaspoon freshly ground black pepper
4 bacon slices, cooked and crumbled
Preparation
Cook pasta in boiling water 10 minutes or until al dente; add asparagus during final 2 minutes of cooking. Drain pasta mixture in a colander over a bowl, reserving 1/3 cup cooking liquid. Combine reserved cooking liquid, egg substitute, and milk, stirring with a whisk.
Heat a large nonstick skillet over medium-high heat. Add oil and onion to pan; sauté 2 minutes. Add vermouth; cook 1 minute. Add pasta mixture; stir to combine. Remove from heat; stir in milk mixture, chicken, and cheese. Place pan over medium heat, and cook 4 minutes or until slightly thick, stirring frequently. Remove from heat; stir in parsley, salt, pepper, and bacon. Serve immediately.
Nutritional Information
Calories:416 (23% from fat)
Fat:10.8g (sat 3.7g,mono 4.4g,poly 2g)
Protein:34.7g
Carbohydrate:41.9g
Fiber:3.1g
Cholesterol:60mg
Iron:3.4mg
Sodium:700mg
Calcium:236mg
Crock Pot BBQ Chicken
I think I found this recipe on a chat board on www.thenest.com, but I can't remember for sure! It was easy, tasty and even my 3 year old enjoyed it!
6 chicken breasts (I used boneless)
1 1/2 cups BBQ sauce
1/3 cup brown sugar
2 T Worcestershire sauce
Place chicken breasts on bottom of crock pot (I used frozen...I was in a hurry!). Mix remaining ingredients together. Pour sauce mixture over chicken to cover. Cook on low for 7-8 hours. Either shred chicken and mix with a little of the juice or extra BBQ sauce, or just serve each chicken breast on a plate with side dishes.
My Favorite Kid Friendly Meals To Freeze
My son is 3 and he is getting better at eating more foods, but some nights he just won't eat what I am making (especially if it's steak, something spicy, or Asian stir fry type meals). I always plan ahead because I don't like him to eat a lot of prepared foods high is sodium and fat. I always freeze leftovers of things he will eat in small, 1 cup plastic containers and label them all. This way I can easily pull these from the freezer on nights where we are eating late and he's hungry early, or I know he just won't eat what I am making for us. Trust me, stocking the freezer for your little one's is THE BEST solution to dinner time troubles for a working mom!
Beef Stew
Pasta with meat sauce
Meatballs
Chicken and Rice Casserole
Risotto
Grilled Chicken Breast
Taco Meat
Mexican Casserole
Lasagna
Stuffed Shells
Chicken Parmesan
Italian Wedding Soup
Chicken Noodle Soup
Italian Hamburgers (already cooked)
Turkey Burgers
Meatloaf
Quiche
Sloppy Joes
Extra things I keep on hand are bags of frozen veggies (I can quickly pull out 1 portion and microwave them as a side dish with any of the above)
Hummus - he loves it and it's good protein and fiber
Refried Beans and Flour Tortillas - easy to make bean and cheese quesadillas
Cottage cheese in individual cups - it's low fat, good protein
Yogurt
Frozen Garlic Toast - I can pull out 1 piece at a time and quickly bake it
Weekly Menu
Monday: BBQ Chicken in the crock pot, green beans
Tuesday: Sizzling Asian Beef with Broccoli and Rice
Wednesday: Chicken and Asparagus Carbanara, tossed salad
Thursday: Beef Stew (from my freezer just for my husband and son - because I am going out for girls night!!! I always freeze extras for nights like this)
Friday: Chopped Salad (chicken, boiled egg, veggies), hummous and garlic pita chips
Chicken Stuffed with Goat Cheese and Garlic
I got this recipe from www.cookinglight.com. It was easy and tasted pretty good. I also added in sun dried tomatoes to the goat cheese mixture...very tasty!
Ingredients
4 ounces goat cheese, softened
3 tablespoons thinly sliced fresh basil, divided
1 tablespoon minced garlic
2 tablespoons sun dried tomatoes chopped fine (I added this to the original recipe)
4 (6-ounce) skinless, boneless chicken breast halves
1 (25.5-ounce) jar fat-free Italian herb pasta sauce
3 whole garlic cloves
3 cups hot cooked fettuccine (about 6 ounces uncooked pasta)
Preparation
Combine goat cheese, 2 tablespoons basil, and minced garlic; set aside.
Place each chicken breast half between 2 sheets of heavy-duty plastic wrap, and pound each half to a 1/4-inch thickness using a meat mallet or rolling pin. Divide the cheese mixture evenly among breast halves. Roll up jelly-roll fashion. Tuck in sides; secure each roll with wooden picks.
Heat the pasta sauce and whole garlic cloves in a large skillet over medium heat; add chicken. Cover and cook 25 minutes or until chicken is done. Serve over pasta. Garnish with 1 tablespoon basil.
Nutritional Information
Calories:503 (15% from fat)
Fat:8.3g (sat 4.7g,mono 1.9g,poly 0.7g)
Protein:57.2g
Carbohydrate:48.1g
Fiber:5.5g
Cholesterol:112mg
Iron:3.8mg
Sodium:785mg
Calcium:137mg
Chipotle BBQ Burgers with Cole Slaw
I got this recipe from www.cookinglight.com. It was quick, easy and had a little spice. I served with a tossed salad and put the burgers on whole grain wheat rolls. I will definitely make this again!
Chipotle and BBQ Burgers and Slaw
Yield: 4 servings (serving size: 1 burger)
Ingredients
1/2 cup dry breadcrumbs
2 tablespoons barbecue sauce
1 tablespoon chopped chipotle chile's, canned in adobo sauce
1 teaspoon bottled minced garlic
1 pound lean ground beef
1 large egg
Cooking spray
2 cups cabbage-and-carrot coleslaw
1 tablespoon reduced-fat mayonnaise
1 tablespoon reduced-fat sour cream
1 teaspoon sugar
1 teaspoon cider vinegar
1/8 teaspoon salt
1/8 teaspoon black pepper
4 (1 1/2-ounce) hamburger buns
Preparation
Combine first 6 ingredients. Divide mixture into 4 equal portions, shaping each into a 1/2-inch-thick patty.
Heat a large nonstick skillet over medium-high heat. Coat pan with cooking spray. Add patties to pan; cook for 4 minutes on each side or until a meat thermometer registers 160°.
Combine coleslaw and next 6 ingredients (through pepper) in a large bowl; toss well. Place 1 patty on bottom half of each bun; top each serving with 1/2 cup coleslaw mixture and top half of bun.
Nutritional Information
Calories: 358 (23% from fat)
Fat: 9.1g (sat 3g,mono 2.7g,poly 1.9g)
Protein: 32.1g
Carbohydrate: 36.3g
Fiber: 2.6g
Cholesterol: 115mg
Iron: 4.3mg
Sodium: 609mg
Calcium: 112mg
Crock Pot Beef Fajitas
I think I got this recipe from a chat board on www.thenest.com. It was easy and something different in the crock pot. The meat came out very tender. I will definitely make this one again!
1 1/2 lbs flank steak
1 large onion sliced
2 green peppers sliced
2 red peppers sliced
2 cloves minced garlic
3/4 cup fresh salsa
3 T lime juice
1 T Olive Oil
1 T tomato paste
1 tsp black pepper
1/2 tsp salt
1/2 tsp cumin
1/2 tsp Mexican Fiesta Seasoning or Chili Powder
Place flank steak in bottom of crock pot. Mix salsa, lime juice, olive oil, tomato paste, salt/pepper, cumin, Mexican fiesta seasoning and garlic together. Pour over meat to cover meat well. Place onions/peppers on top of meat. Cover and cook on low for 7-8 hours until meat is tender. Remove meat from crock pot. Let stand 10 minutes and slice thin. Serve with flour tortillas, sour cream, salsa, guacamole, jalapenos and shredded cheese.
Sun Dried Tomato Risotto
I found this recipe online on a chat board....maybe on www.thenest.com but I am not sure (I want to give credit but I can't remember!). It's easy and oh so tasty! My husband requests this all the time. It's great as meal or side dish. My 3 year old also enjoys this one which is a real bonus for me. Enjoy!
2 cloves garlic minced
1 onion chopped fine
2-3 T olive oil
1 cup aborio rice
1/2 cup sun dried tomatoes chopped fine (that were packed in oil)
2 T oil (reserved from the sun dried tomatoes)
1/4 cup fresh basil chopped fine
2 T fresh Italian flat leaf parsley chopped fine
4-5 cups low fat, low sodium chicken broth
1/2 cup Parmesan cheese (I like imported)
Saute onion, garlic and aborio rice in olive oil until onion is soft (a few minutes). Add 1 large ladle of chicken broth, sun dried tomatoes, basil and parsley. Cook over medium heat for a few minutes. Add in oil from sun dried tomatoes. Add in 1 ladle full of broth at a time and keep stirring rice until liquid is absorbed. Keep repeating this process until most or all of broth is gone and the rice is cooked through (it takes about 30 minutes or so). Once rice is cooked - add salt and pepper to taste and Parmesan cheese. Mix thoroughly and serve.
Beef Marsala Stroganoff
My husband loves beef stroganoff and chicken marsala so I got a little creative on a whim. It came out pretty good. I only had beef stew meat and it came out OK, but I think next time I would use a more quality cut of beef. My husband said he liked it just the way it was though.
1 1/2 lbs beef stew meat (or your beef cut of choice)
4 T flour
Salt/Pepper
1-2 T Olive Oil (I don't measure)
1 good size shallot - diced fine
2 cups washed, sliced mushrooms
1 cup low sodium low fat beef broth (give or take...I don't measure!)
1/2 cup of Sweet Marsala Wine (give or take...I don't measure!)
1/2 cup low fat sour cream (again...I don't measure so give or take)
Fresh Parsley
Cooked Egg Noodles to serve with
Cut meat into small pieces; place in bowl and salt and pepper meat, then coat meat with 2 T of flour (reserve other 2T of flour); Cook meat in olive oil in a large skillet until brown (it doesn't have to be completely cooked through). Take meat out of pan and set aside.
In skillet add in shallot and mushrooms. Saute a few minutes until cooked. Add in remaining 2 T of flour. Add in beef broth and wine and mix well. Add beef back into skillet. Cover and cook on medium heat for about 15 minutes, occasionally stirring. Add in sour cream and additional S&P and wine to taste. Serve over cooked egg noodles and top with fresh chopped parsley.
P.S. Leftovers freeze well too!
Subscribe to:
Comments (Atom)